In questo capitolo andiamo a definire la struttura del nostro WCF Service.
Abbiamo creato un webservice che fornice i dati dal backend. Ora dobbiamo creare uno strato isolato che permetta di interporsi tra il front end e il backend e isolare l’accesso ai dati e le dipendenze tra i due strati fondamentali.
In questo strato andiamo a definire un servizio wcf che esporrà i dati anagrafici e che utilizzerà un client soap per chiamare il webservice sottostante.
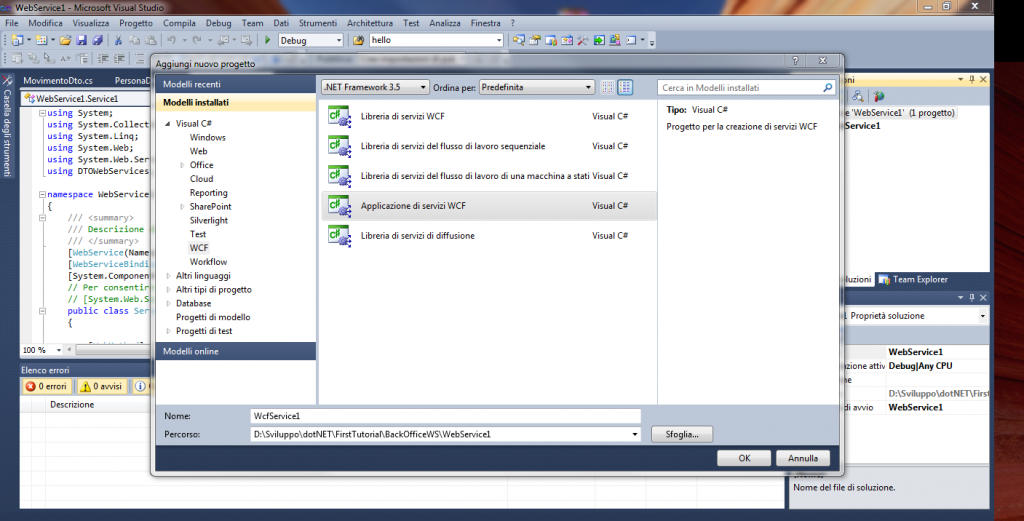
creiamo quindi nella solution precedente un altro progetto, di tipo WCF, Applicazione di servizi WCF:
Utilizziamo la funzione di refactoring per rinominare l’interfaccia del nostro servizio wcf, chiamandola IWCFAnagraficaService e rinominando il file cs in IWCFAnagraficaService.cs
Generalmente per creare un client verso un webservice, basta aggiungere il riferimento ad una risorsa web,e puntare al wsdl del webservice, e magicamente il tool di generazione, crea un proxy client completo.
Il Proxy nasce per rappresentare un contratto tra client e servizio, ma quando lo si genera in questa maniera, si rimane effettivamente legati ai tools, e alle loro problematiche .. WCF semplifica questo aspetto arrivando a definire un interfaccia di servizio che opportunatamente decorata da annotations e con gli attributi di serializzazione necessari, permette di chiamare in maniera trasparente il servizio.
Nessun tool di mezzo ed un codice molto pulito e manutenibile. Unico Drawback evidente, la necessità di dichiararci tutti gli oggetti che eseguono il binding con i risultati del webservice.
Andiamo quindi a creare una cartella dto in questo progetto .
Creiamo un DatiPersonaDto, con i dati che ci interessa esporre verso l’esterno ,un IndirizzoDto e un DatiMovimentoDto, in modo da astrarci dal webservice sottostante ( e ragionare piu con un modello adatto alla fruizione indipendente dei dati).
Creiamo cosi i tre Dto :
IndirizzoDto:
1
2
3
4
5
6
7
8
9
10
11
12
13
14
15
16
17
18
19
20
21
22
23
24
25
26
27
28
29
30
31
| using System;
using System.Collections.Generic;
using System.Linq;
using System.Web;
namespace WcfService1dto
{
public class IndirizzoDto
{
public int IdIndirizzo { get; set; }
public string TipoIndirizzo { get; set; }
public string Citta { get; set; }
public string Indirizzo { get; set; }
public string CAP { get; set; }
public string Provincia { get; set; }
}
} |
DatiPersonaDto:
1
2
3
4
5
6
7
8
9
10
11
12
13
14
15
16
17
18
19
20
21
22
23
24
25
26
27
28
29
| using System;
using System.Collections.Generic;
using System.Linq;
using System.Web;
namespace WcfService1dto
{
public class DatiPersonaDto
{
public int UserId { get; set; }
public string Nome { get; set; }
public string Cognome { get; set; }
public DateTime DataNascita { get; set; }
public IndirizzoDto[] Indirizzi { get; set; }
}
} |
DatiMovimentoDto:
1
2
3
4
5
6
7
8
9
10
11
12
13
14
15
16
17
18
19
20
21
22
23
24
25
| using System;
using System.Collections.Generic;
using System.Linq;
using System.Web;
namespace WcfService1dto
{
public class DatiMovimentoDto
{
public DateTime DataMovimento { get; set; }
public string Descrizione { get; set; }
public Double Valore { get; set; }
}
} |
Ora che abbiamo definito i dati che verranno forniti da questo servizio, andiamo a definire le operationContract sull’interfaccia del servizio.
1
2
3
4
5
6
7
8
9
10
11
12
13
14
15
| [ServiceContract]
public interface IWCFAnagraficaService
{
[OperationContract]
DatiPersonaDto getDatiAnagrafici(string username);
[OperationContract]
List<DatiMovimentoDto> getMovimentiPersona(string username);
} |
Prima di passare all’implementazione del metodo nel servizio, andiamo a definire chi effettivamente eseguirà la chiamata al webservice. Definiamo un webserviceclient generico per il webservice creato in precedenza.
Utilizziamo Wcf anche per eseguire la connessione al webservice, realizzando un client senza andare a creare il webservice proxy , e quindi andando a definire anche in questo caso un interfaccia per il contratto tra client e service e decorarlo con le annotazioni necessarie.
Creiamo un folder webserviceclient nel nostro progetto e aggiungiamo un elemento di codice chiamato WebServiceSoapClient.cs
Utilizziamo in generics in modo da renderlo riusabile e indipendente. In questo
1
2
3
4
5
6
7
8
9
10
11
12
13
14
15
16
17
18
19
20
21
22
23
24
25
26
27
28
29
30
31
32
33
34
35
36
37
38
39
40
41
42
43
44
45
46
47
48
49
50
51
52
53
54
55
56
57
58
59
60
61
62
63
64
65
66
67
68
69
70
71
72
73
74
75
76
77
78
79
80
81
82
83
84
85
86
87
88
89
90
91
| using System;
using System.ServiceModel;
using System.ServiceModel.Channels;
using System.Text;
public class WebServiceSoapClient<T> : IDisposable
{
private readonly T myChannel;
private readonly IClientChannel myClientChannel;
public WebServiceSoapClient(string url)
: this(url, null)
{
}
public WebServiceSoapClient(string url,
Action<CustomBinding, HttpTransportBindingElement, EndpointAddress, ChannelFactory> init)
{
//transport http o https
var transport = url.StartsWith("http", StringComparison.InvariantCultureIgnoreCase)
? new HttpTransportBindingElement()
: new HttpsTransportBindingElement();
var binding = new CustomBinding();
//binding soap
binding.Elements.Add(new TextMessageEncodingBindingElement(MessageVersion.Soap12, Encoding.UTF8));
binding.Elements.Add(transport);
var address = new EndpointAddress(url);
//canale verso il webservice
var factory = new ChannelFactory<T>(binding, address);
if (init != null)
{
init(binding, transport, address, factory);
}
this.myClientChannel = (IClientChannel)factory.CreateChannel();
this.myChannel = (T)this.myClientChannel;
}
public void Dispose()
{
this.myClientChannel.Dispose();
}
public IClientChannel ClientChannel
{
get { return this.myClientChannel; }
}
public T Channel
{
get { return this.myChannel; }
}
} |
L’oggetto appena creato ci permette di instanziare semplicemente un servizio utilizzando un interfaccia che ne descrive il contratto.
Quindi nel folder webserviceclient andiamo a creare gli oggetti per il binding dei tipi tornati dal webservice, e l’interfaccia per il servicecontract tra il nostro wcf e il webservice.
PersonaDto.cs
1
2
3
4
5
6
7
8
9
10
11
12
13
14
15
16
17
18
19
20
21
22
23
24
25
26
27
28
29
30
31
32
33
| using System.Runtime.Serialization;
using System;
[DataContract]
[Serializable]
public class PersonaDTO
{
[DataMember(IsRequired = true)]
public int UserId { get; set; }
public string Username { get; set; }
public string Nome { get; set; }
public string Cognome { get; set; }
public DateTime DataNascita { get; set; }
public string CittaResidenza { get; set; }
public string IndirizzoResidenza { get; set; }
public string CAPResidenza { get; set; }
public string ProvinciaResidenza { get; set; }
} |
MovimentoDto.cs
1
2
3
4
5
6
7
8
9
10
11
12
13
14
15
16
17
18
19
20
21
22
23
24
25
26
27
28
29
30
31
32
33
| using System.Runtime.Serialization;
using System;
[DataContract]
[Serializable]
public class MovimentoDTO
{
[DataMember]
public int UserId { get; set; }
[DataMember]
public int IdMovimento { get; set; }
[DataMember]
public DateTime DataMovimento { get; set; }
[DataMember]
public string Descrizione { get; set; }
[DataMember]
public Double Valore { get; set; }
} |
e l’interfaccia IAnagraficaInterface.cs
1
2
3
4
5
6
7
8
9
10
11
12
13
14
15
16
17
18
19
20
21
22
23
24
25
| using System.ServiceModel;
namespace WcfService1.webserviceclient
{
[XmlSerializerFormat]
[ServiceContract(Namespace = "http://metalide.com/webservice1/")]
public interface IAnagraficaInterface
{
[OperationContract]
PersonaDTO getPersona(string username);
[OperationContract]
MovimentoDTO[] getMovimenti(int userid);
}
} |
Ora che abbiamo definito tutte le nostre interfacce, andiamo ad implementare gli operationContract nell’implementazione del servizio nella classe WCFAnagraficaService
Utilizziamo un approccio thread safe nela definizione del client per il webservice in modo da riusarlo in maniera corretta
e implementiamo i due metodi del contratto, e l’ottenimento del canale di comunicazione tramite il client.
1
2
3
4
5
6
7
8
9
10
11
12
13
14
15
16
17
18
19
20
21
22
23
24
25
26
27
28
29
30
31
32
33
34
35
36
37
38
39
40
41
42
43
44
45
46
47
48
49
50
51
52
53
54
55
56
57
58
59
60
61
62
63
64
65
66
67
68
69
70
71
72
73
74
75
76
77
78
79
80
81
82
83
84
85
86
87
88
89
90
91
92
93
94
95
96
97
98
99
100
101
102
103
104
105
106
107
108
109
110
111
112
113
114
115
116
117
118
119
120
121
122
123
124
125
126
127
128
129
130
131
132
133
134
135
136
137
| using System.Collections.Generic;
using WcfService1dto;
using WcfService1.webserviceclient;
namespace WcfService1
{
public class WCFAnagraficaService : IWCFAnagraficaService
{
//approccio thread safe
private static readonly object _synch = new object();
private static volatile WebServiceSoapClient<IAnagraficaInterface> webServiceClient;
public DatiPersonaDto GetDatiAnagrafici(string username)
{
var result1 = this.Channel.getPersona(username);
DatiPersonaDto dto = new DatiPersonaDto();
dto.UserId = result1.UserId;
dto.Cognome = result1.Cognome;
dto.Nome = result1.Nome;
dto.DataNascita = result1.DataNascita;
IndirizzoDto indirizzoDto = new IndirizzoDto();
indirizzoDto.IdIndirizzo = 1;
indirizzoDto.TipoIndirizzo = "residenza";
indirizzoDto.CAP = result1.CAPResidenza;
indirizzoDto.Citta = result1.CittaResidenza;
indirizzoDto.Indirizzo = result1.IndirizzoResidenza;
indirizzoDto.Provincia = result1.ProvinciaResidenza;
IndirizzoDto[] indirizzi = new IndirizzoDto[1];
indirizzi[0] = indirizzoDto;
dto.Indirizzi = indirizzi;
return dto;
}
public List<DatiMovimentoDto> GetMovimentiPersona(string username)
{
int userid = 1;
if (username.Equals("test"))
{
userid = 2;
}
var res = this.Channel.getMovimenti(userid);
List<DatiMovimentoDto> listaMovimenti = new List<DatiMovimentoDto>();
foreach (MovimentoDTO item in res)
{
DatiMovimentoDto dto = new DatiMovimentoDto();
dto.DataMovimento = item.DataMovimento;
dto.Descrizione = item.Descrizione;
dto.Valore = item.Valore;
listaMovimenti.Add(dto);
}
return listaMovimenti;
}
public IAnagraficaInterface Channel
{
get
{
if (webServiceClient == null)
{
lock (_synch)
{
if (webServiceClient == null)
{
webServiceClient = new WebServiceSoapClient<IAnagraficaInterface>(
@"http://localhost:4715/Service1.asmx");
}
}
}
return webServiceClient.Channel;
}
}
}
} |
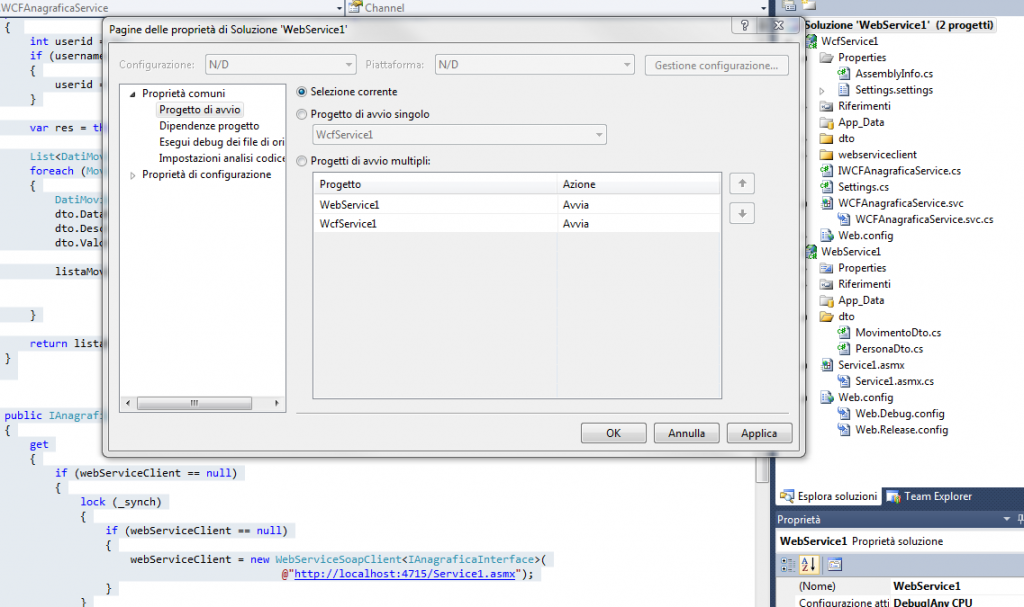
Se configuriamo la solution, in modo da avere progetti di avvio multipli, siamo in grado di eseguire il webservice in background, e testare il wcfservice tramite il client di test.
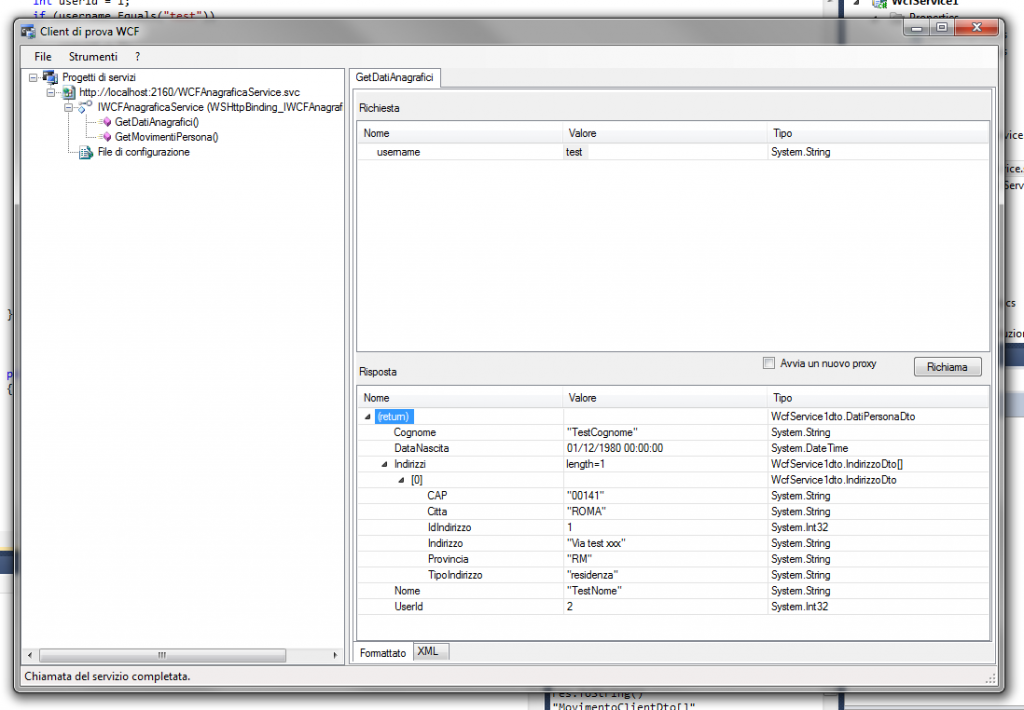
Eseguendo in debug, possiamo testare entrambi i metodi del nostro wcf service:
Scarica qui la solution completa


